

Understanding React State with Practical Examples

Introduction
React is a commonly used JavaScript library developed by Facebook in 1995. It’s used for creating a single-page application, user interfaces, etc. One of the most useful points is state management. State represents that the data is managed within the component.
In this article, we will discuss the React state with practical examples, such as counters, managing form inputs, etc.
State in React
State is used for managing and tracking the condition of the application using the useState Hook. It is mutable and used for sending data within the component. If you are changing the state, React automatically performs the re-rendering of the component to change the data in the UI.
Syntax:
const [data, setData] = useState(currentState);
Example
Code:
import React, { useState } from "react";
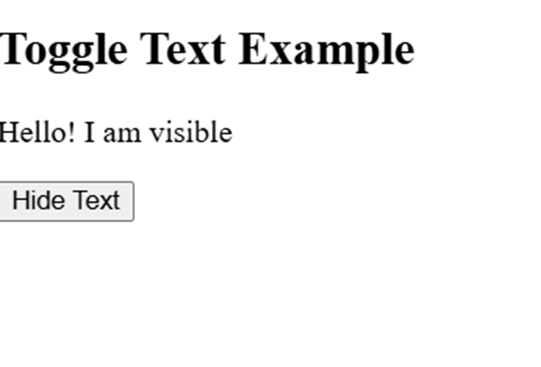
function ToggleText() {
const [show, setShow] = useState(true);
return (
<div>
<h2>Toggle Text Example</h2>
{show && <p>Hello! I am visible </p>}
<button onClick={() => setShow(!show)}>
{show ? "Hide" : "Show"} Text
</button>
</div>
);
}
export default ToggleText;
Output:
How State Works in React?
React uses the unidirectional data flow, which means that when state changes, React automatically changes the virtual DOM. Here are some of the points that are shown below in detail:
1) Initializing state Object:
Initializing a state Object in React is helpful for making interactive and dynamic components. With the use of a constructor, you can easily initialize a state object in the class component.
Example
Code:
import React from 'react';
class Welcome extends React.Component {
constructor(props) {
super(props);
// Initializing state
this.state = {
message: 'Hello, React!'
};
}
render() {
return (
<div>
<h1>{this.state.message}</h1>
</div>
);
}
}
export default Welcome;
2) Modify the state in React:
React state is immutable, which means you cannot directly update the state in React. You can update through the class components this.setState() method but in functional components by useState() method.
Example
Code:
import React, { useState } from 'react';
function Counter() {
const [count, setCount] = useState(0); // Initial state
return (
<div>
<h2>Count: {count}</h2>
<button onClick={() => setCount(count + 1)}>Increase</button>
</div>
);
}
export default Counter;
Manage the state in functional Components:
In modern ways, we use the useState Hook to manage the state in functional components. It contains two values, like the initial state, and updates the state function.
Example
Code:
import React, { useState } from "react";
function UserInfo() {
const [name, setName] = useState("Tpoint");
const [age, setAge] = useState(12);
return (
<div>
<h2>Name: {name}</h2>
<h2>Age: {age}</h2>
<button onClick={() => setName("Tech")}>Change Name</button>
<button onClick={() => setAge(age + 1)}>Increase Age</button>
</div>
);
}
export default UserInfo;
Output:

Manage the state in Class Components:
With the use of this component, you can update the state during the component lifecycle. It uses this.setState() method to modify the state values.
Example
Code:
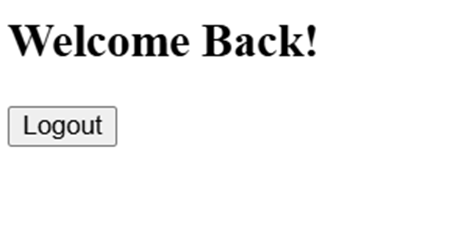
import React from "react";
class LoginInfo extends React.Component {
constructor(props) {
super(props);
this.state = { isLoggedIn: false };
}
toggleLogin = () => {
this.setState({ isLoggedIn: !this.state.isLoggedIn });
};
render() {
return (
<div>
<h2>{this.state.isLoggedIn ? "Welcome Back! " : "Please Log In"}</h2>
<button onClick={this.toggleLogin}>
{this.state.isLoggedIn ? "Logout" : "Login"}
</button>
</div>
);
}
}
export default LoginInfo;
Output:
Practical Examples of React state
Some of the examples shown below using the React state:
1) Form Input handling: Using the form input handling to manage the many input values, such as signup forms, login forms, or search bars, etc.
Example
Code:
import React, { useState } from 'react';
function ShowName() {
const [name, setName] = useState('');
const [submittedName, setSubmittedName] = useState('');
const handleSubmit = (e) => {
e.preventDefault();
setSubmittedName(name);
};
return (
<div>
<form onSubmit={handleSubmit}>
<input
type="text"
value={name}
onChange={(e) => setName(e.target.value)}
placeholder="Enter your name"
/>
<button type="submit">Submit</button>
</form>
{submittedName && <h2>Hello, {submittedName}!</h2>}
</div>
);
}
export default ShowName;
Output:

2) Conditional Re-rendering with state: Using conditional rendering to show only those details when a certain condition is true.
Example
Code:
import React, { useState } from 'react';
function SignupForm() {
const [username, setUsername] = useState('');
const [submitted, setSubmitted] = useState(false);
const handleSubmit = (e) => {
e.preventDefault();
if (username.trim() !== '') {
setSubmitted(true);
}
};
return (
<div style={{ textAlign: 'center', marginTop: '20px' }}>
{!submitted ? (
<form onSubmit={handleSubmit}>
<input
type="text"
value={username}
onChange={(e) => setUsername(e.target.value)}
placeholder="Enter your username"
/>
<button type="submit">Sign Up</button>
</form>
) : (
<h2> Welcome, {username}! Your signup is successful.</h2>
)}
</div>
);
}
export default SignupForm;
Output:

3) Multiple State Variables: It is useful when it contains multiple input fields, such as user details, cart items, etc.
Example
Code:
import React, { useState } from 'react';
function StudentForm() {
const [student, setStudent] = useState({
name: '',
rollNo: '',
course: ''
});
const [submitted, setSubmitted] = useState(false);
const handleChange = (e) => {
const { name, value } = e.target;
setStudent({
...student,
[name]: value