

Step-by-Step Guide to Tuning Your Car Audio for Maximum Clarity
A powerful car audio system can easily impress with volume, but true enjoyment comes from clarity. Properly tuned speakers, amplifiers, and subwoofers deliver a balanced sound where every note is crisp, vocals are clear, and bass hits without distortion. Unfortunately, many people overlook the importance of tuning and end up with muddied sound or overpowering lows.
In this guide, we’ll walk you through a step-by-step process to tune your car audio system for maximum clarity, ensuring your setup—whether factory-upgraded or competition-grade—sounds its absolute best.
Step 1: Start with a Solid Foundation
Before tuning, make sure your installation is done correctly. Check wiring connections, ensure your speakers are securely mounted, and verify that your amplifier is matched to your speakers and subwoofer. Even competition-ready subs like the Pride 300 Comp can’t deliver their best if the system is wired incorrectly or mismatched.
Step 2: Set Your Head Unit to Flat
Your head unit is the control center of your sound. Reset all EQ settings to flat (zero). Disable bass boost, loudness features, or any special effects. Starting flat ensures you’re not compensating for poor tuning with artificial adjustments.
Step 3: Adjust Amplifier Gain Properly
Many people mistake gain for a volume knob, but its purpose is to match the input level of your head unit with your amplifier.
-
Play a clean test track or pink noise.
-
Slowly raise the gain until distortion begins, then back it off slightly.
This ensures your amp drives your speakers with clean, distortion-free power.
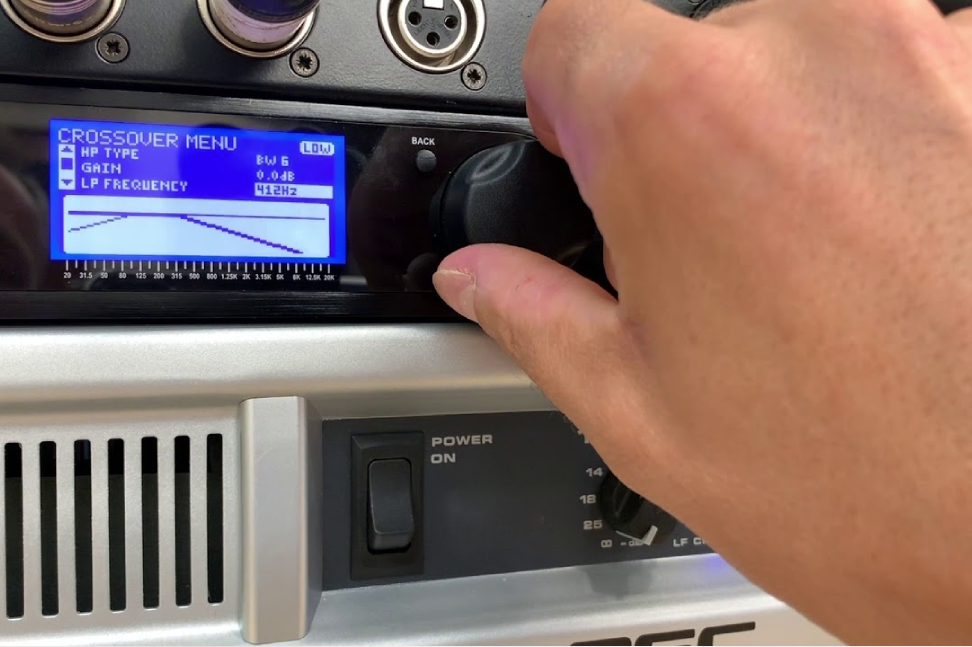
Step 4: Set Crossover Frequencies
Crossovers direct specific frequencies to the right components:
-
Subwoofer: Typically set between 70–100Hz low-pass.
-
Midrange Speakers: Set a high-pass filter at around 80Hz.
-
Tweeters: Often set higher, above 3kHz.
This prevents frequency overlap and ensures every driver plays only what it’s designed for, improving clarity and protecting your gear.
Step 5: Fine-Tune with an Equalizer
Once crossovers and gains are set, use an EQ to shape your sound:
-
Slightly boost mids for clear vocals.
-
Cut overly harsh highs instead of boosting lows.
-
Avoid extreme adjustments—subtle changes provide the most natural sound.
DSP-equipped systems allow even more control, letting you correct for cabin acoustics.
Step 6: Balance Front and Rear Speakers
Front speakers should always take priority since they create your main soundstage. Adjust balance and fader so the music feels like it’s coming from the front, with rear speakers acting as support. This creates a natural, concert-like experience instead of sound coming from behind you.
Step 7: Use Quality Test Tracks
Use high-quality recordings or FLAC files to test your system. Test tracks with a mix of vocals, instruments, and bass will reveal how balanced your system truly is. Avoid low-bitrate MP3s, as they can mask problems or create artificial distortion.
Step 8: Test in Real Driving Conditions
Tuning in a garage or driveway is only half the battle. Road noise, engine hum, and vibrations affect how your system sounds in real-world conditions. Test while driving and make small adjustments to EQ and balance to ensure clarity holds up under normal conditions.
Step 9: Optimize Subwoofer Performance
Your sub is a big part of the tuning equation. If you’re running a high-performance model like the Pride 300 Comp, ensure it’s in the right enclosure, tuned correctly, and blended seamlessly with your mids and highs. A properly integrated sub enhances clarity by filling in low frequencies without overpowering the rest of the system.
Step 10: Revisit and Refine
Tuning is not a one-time job. As your speakers break in, your preferences may change, or you might add new components. Revisit your tuning setup periodically to refine and adjust. Great audio systems evolve with your listening habits.
Final Thoughts
Clarity in car audio doesn’t happen by accident—it’s the result of careful tuning and balance. By following this step-by-step process, you’ll transform your system from “just loud” to professionally tuned clarity that makes every drive enjoyable.
Whether you’re running a modest upgrade or a competition-grade system with a Pride 300 Comp, the principles remain the same: clean wiring, proper gain staging, correct crossover points, and thoughtful EQ adjustments. Get these right, and your music will sound exactly as the artist intended—clear, powerful, and unforgettable.